


Hyper-V Setup and Use (TickTockIT)
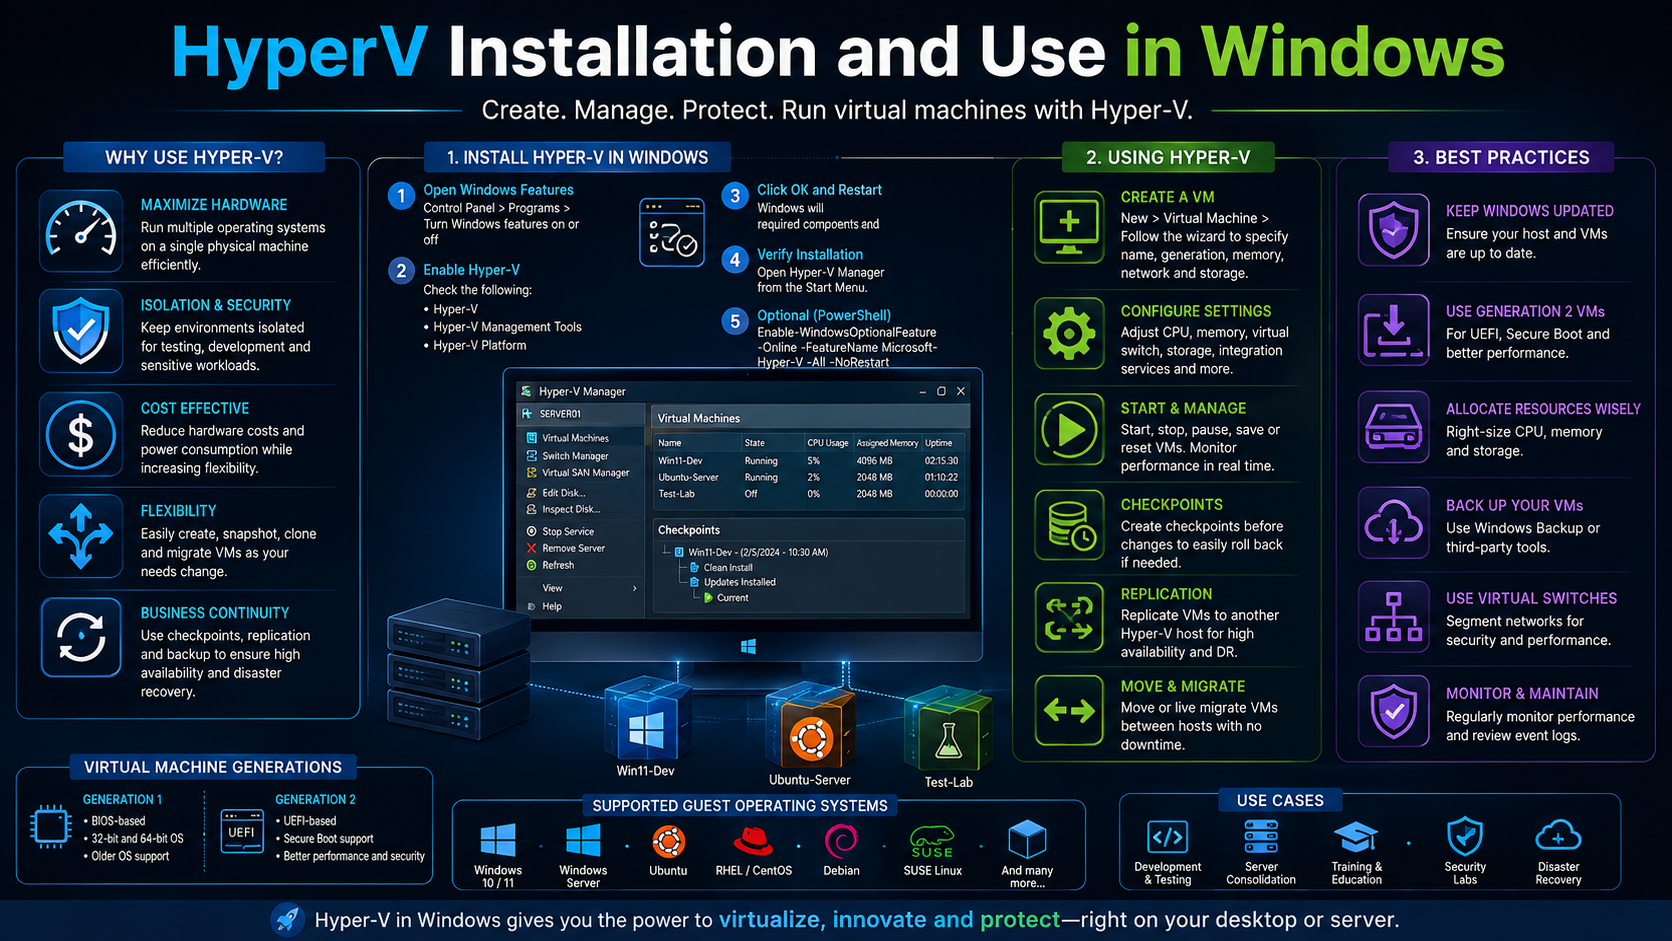
Hyper-V is Microsoft’s built-in virtualisation platform for supported editions of Windows. It allows multiple isolated virtual machines to run on one physical computer, making it useful for software testing, development, training, server consolidation, isolated browsing, and building repeatable lab environments.
This guide explains how to confirm that a computer supports Hyper-V, enable the platform, create virtual switches and virtual machines, install guest operating systems, manage storage and checkpoints, and apply the security and performance practices needed for reliable day-to-day use.
Hyper-V Requirements
Hyper-V is available on 64-bit editions of Windows 11 Pro, Enterprise, and Education, and on supported Windows Server editions. It is not normally included with Windows Home. The physical processor must support hardware-assisted virtualisation and Second Level Address Translation, and virtualisation must be enabled in the computer’s UEFI or BIOS firmware.
The host also needs enough memory, processor capacity, and storage for Windows and every running virtual machine. Although a small test VM may run with modest resources, several active Windows VMs can quickly consume substantial RAM and disk capacity.
Check Whether the Computer Supports Hyper-V
Open PowerShell or Command Prompt and run:
systeminfo.exeAt the bottom of the report, check the Hyper-V Requirements section. The required items should report Yes. If the report says that a hypervisor has already been detected, Hyper-V or another Windows virtualisation component is already active.
You can also check whether firmware virtualisation is enabled in Task Manager under Performance > CPU. The Virtualization field should show Enabled.
Enable Virtualisation in UEFI or BIOS
If virtualisation is disabled, restart the computer and enter its firmware settings. The setting may be called Intel Virtualization Technology, Intel VT-x, AMD-V, SVM Mode, or Secure Virtual Machine. Enable it, save the configuration, and restart Windows.
Firmware menus vary between manufacturers. Do not alter unrelated processor, storage, or security settings unless their purpose is understood.
Install Hyper-V Using Windows Features
- Open Control Panel > Programs > Turn Windows features on or off.
- Select Hyper-V, including Hyper-V Management Tools and Hyper-V Platform.
- Select OK and allow Windows to install the components.
- Restart the computer when prompted.
After restarting, open Hyper-V Manager from the Start menu.
Install Hyper-V with PowerShell
Hyper-V can also be enabled from an elevated PowerShell session:
Enable-WindowsOptionalFeature -Online -FeatureName Microsoft-Hyper-V -AllRestart Windows after the command completes. To confirm the installed state, run:
Get-WindowsOptionalFeature -Online -FeatureName Microsoft-Hyper-V-AllPlan the Virtual Machine Storage Locations
Before creating virtual machines, choose where configuration files, virtual disks, installation media, exports, and checkpoints will be stored. A fast SSD or NVMe drive provides much better performance than a heavily used system disk or slow external drive.
In Hyper-V Manager, open Hyper-V Settings and set appropriate default folders for virtual hard disks and virtual machine configuration files. Keep adequate free space available because dynamically expanding disks and checkpoints can grow significantly.
Create a Hyper-V Virtual Switch
A virtual switch connects virtual network adapters to other VMs, the host, or the physical network. Open Virtual Switch Manager in Hyper-V Manager and choose the required switch type:
- External: connects VMs to the physical network and usually provides internet and LAN access.
- Internal: allows communication between VMs and the Hyper-V host but not directly with the external network.
- Private: permits communication only between VMs attached to that switch.
For an external switch, select the correct physical network adapter. If the host must continue using that adapter, leave Allow management operating system to share this network adapter enabled.
Create a New Virtual Machine
- In Hyper-V Manager, select the host and choose New > Virtual Machine.
- Enter a descriptive name and, if required, choose a custom storage location.
- Select the VM generation.
- Assign startup memory and decide whether Dynamic Memory should be enabled.
- Connect the VM to the appropriate virtual switch.
- Create or attach a virtual hard disk.
- Attach a bootable ISO image or configure network-based installation.
- Review the settings and complete the wizard.
Generation 1 or Generation 2
Generation 2 is normally the correct choice for modern versions of Windows and supported Linux distributions. It uses UEFI firmware, supports Secure Boot, and provides a modern virtual hardware model.
Generation 1 provides legacy BIOS-compatible virtual hardware and may be necessary for older operating systems. A VM’s generation cannot be changed after it has been created, so confirm guest compatibility first.
Memory and Processor Allocation
Assign enough resources for the guest operating system without starving the host. Dynamic Memory can adjust allocated RAM within configured minimum and maximum limits, which is useful when several VMs share one host.
Start conservatively with virtual processors. Giving a VM every available logical processor does not guarantee better performance and can reduce the responsiveness of both the host and other VMs. Monitor actual workload before increasing resources.
Virtual Hard Disk Choices
Hyper-V normally uses VHDX virtual disks. VHDX supports larger capacities and provides better resilience than the older VHD format. A dynamically expanding disk initially consumes only the space used by its data, while a fixed-size disk reserves its full capacity immediately and can provide more predictable performance.
Use separate virtual disks where it improves management, backup, performance, or recovery. Never allow the host volume containing VMs to run out of free space.
Install the Guest Operating System
Open the VM’s settings, verify that the installation ISO is attached, and start the VM. Select Connect to open the Virtual Machine Connection window and complete the operating-system installation normally.
For supported Windows guests, Hyper-V integration components are built into the operating system. Supported Linux distributions include the relevant Hyper-V drivers through the Linux kernel, although current updates should still be installed after deployment.
Secure Boot and TPM
Generation 2 VMs support Secure Boot. Windows guests normally use the Microsoft Windows Secure Boot template, while some Linux guests require the Microsoft UEFI Certificate Authority template.
A virtual Trusted Platform Module can be enabled when required by the guest operating system, including Windows 11. Review the VM’s security settings while it is turned off and ensure that recovery information for encryption technologies such as BitLocker is protected.
Enhanced Session Mode
Enhanced Session Mode provides an improved console connection for supported Windows guests. It can enable dynamic display resizing, clipboard sharing, audio, printers, local drives, and other redirected devices.
Enable it in the host’s Hyper-V settings and ensure Remote Desktop services are available in the guest. Only redirect host resources that the VM genuinely needs.
Checkpoints
A checkpoint records a VM’s state so that changes can be reversed. Production checkpoints use backup technology within the guest and are preferred for normal workloads. Standard checkpoints capture the VM’s running state and are more appropriate for short-lived test environments.
Checkpoints Are Not Backups
Checkpoints depend on the VM’s existing files and storage. They should be used temporarily before controlled changes, then removed after testing. Long checkpoint chains consume storage, reduce performance, and complicate recovery.
Export, Import, and Move Virtual Machines
Hyper-V Manager can export a VM with its configuration, virtual disks, and checkpoints. The exported VM can then be imported on the same or another compatible Hyper-V host.
During import, Hyper-V can register the VM in place, restore it to another location, or create a new unique copy. Confirm storage paths, switch mappings, processor compatibility, and available host resources after moving a VM.
Back Up Hyper-V Virtual Machines
Use backup software that is explicitly Hyper-V aware and supports application-consistent backups. Copying active VHDX files manually is not a reliable backup method. Protect VM configuration, virtual disks, application data, encryption recovery material, and any supporting network or deployment documentation.
Test complete VM recovery as well as individual file or application recovery. Store at least one protected backup copy away from the Hyper-V host.
Security and Isolation
- Keep the Windows host and guest operating systems fully patched.
- Restrict membership of the local Hyper-V Administrators group.
- Use separate administrative accounts for host management.
- Apply host firewall rules and network segmentation.
- Avoid exposing Hyper-V management services directly to the internet.
- Use Secure Boot and virtual TPM where supported.
- Protect VM backups and exports because they contain complete copies of guest data.
- Disable unnecessary clipboard, drive, device, and network sharing.
Performance Monitoring
Use Task Manager, Resource Monitor, Performance Monitor, Hyper-V Manager, and PowerShell to monitor CPU demand, available memory, disk latency, storage growth, and network throughput. Performance problems frequently result from storage contention or insufficient host memory rather than a lack of virtual processors.
Keep the host focused on virtualisation where practical. Unnecessary applications, background services, and security exclusions can reduce reliability or create avoidable risk.
Useful PowerShell Commands
Get-VM
Get-VMNetworkAdapter -VMName "VM-Name"
Get-VHD -Path "D:\Hyper-V\Virtual Hard Disks\VM-Name.vhdx"
Start-VM -Name "VM-Name"
Stop-VM -Name "VM-Name"
Checkpoint-VM -Name "VM-Name" -SnapshotName "Before-Change"
Export-VM -Name "VM-Name" -Path "E:\Hyper-V-Exports"
Run administrative commands from an elevated PowerShell session and verify VM names and file paths before making changes.
Common Hyper-V Problems
- Hyper-V is unavailable: confirm the Windows edition, processor capabilities, and firmware virtualisation settings.
- The VM has no network connection: check its virtual network adapter, switch assignment, host adapter, VLAN settings, DHCP, and firewall rules.
- The VM will not boot from ISO: verify the ISO, boot order, VM generation, and Secure Boot template.
- The host becomes slow: reduce excessive VM memory or processor allocations and check storage latency.
- Disk space disappears: inspect dynamically expanding VHDX files and old checkpoint AVHDX files.
- USB devices are unavailable: use Enhanced Session Mode, Remote Desktop redirection, or another supported redirection method.
- Another virtualisation product fails: check whether it supports running alongside the Windows hypervisor.
Recommended Setup Checklist
- Confirm hardware support and enable virtualisation in firmware.
- Install Hyper-V and restart Windows.
- Choose dedicated VM and backup storage locations.
- Create and document the required virtual switches.
- Create a correctly sized Generation 2 VM where supported.
- Install and patch the guest operating system.
- Enable Secure Boot, virtual TPM, and appropriate isolation controls.
- Configure Hyper-V-aware backups.
- Test restoration and document the VM configuration.
- Monitor capacity, performance, checkpoints, and security updates.
Final Thoughts
Hyper-V provides a capable virtualisation platform without requiring a separate third-party hypervisor. A reliable deployment depends on more than completing the New Virtual Machine wizard: storage, networking, resource allocation, security, backup, and recovery all need to be planned together.
Start with a small, well-documented VM, test its network and recovery process, and expand only after the host’s resource limits are understood. Used carefully, Hyper-V provides an effective foundation for development environments, technical labs, isolated testing, and production Windows workloads.